Hands-On Project 1-4 You learned how to dynamically change an image using the getElementById('id').src expression along with the onclick event handler. In this project you will use the onclick event handler to automatically fill delivery address input boxes with preassigned values using the expression: document.getElementById('id').value = variable; where id is the value of the id attribute of a web form element and variable is the variable value to write into the element. A preview of the completed project is shown in Figure 1-26. Do the following: 1. Use your code editor to open project01-04_txt.html and project01-04_txt.js from the HandsOnProject_01 folder. Enter your name and the date in the comment section of each document and save them as project01-04.html and project01-04.js, respectively. 2. Go to the project01-04.js file in your code editor. Below the comment section declare the following variables and initial values: homeStreet 5 “1 Main St.”, homeCity 5 “Sicilia”, homeState 5 “MA”, homeCode 5 “02103”, workStreet 5 “15 Oak Ln.”, workCity 5 “Central City”, workState 5 “MA”, workCode 5 “02104”. 3. Close the file, saving your changes. 4. Go to the project01-04.html file in your code editor. Directly below the closing tag insert a script element accessing the project01-04.js file. Do not include the defer or async attributes so that the code in the external file loads as the HTML is loaded. 5. Directly below the closing tag for the Home address, insert a script element. Within the script, insert commands to write the following two lines of HTML code: homeStreet homeCity, homeState homeCode where homeStreet, homeCity, homeState, and homeCode are the variables you defined in Step 2. (Hint: You will have to use the add operator ( 1 ) to combine the variables with the literal text strings in these two lines of code.) 6. Directly below the closing tag for the Work address, insert another script element. Within the script, insert commands the write the following two lines: workStreet workCity, workState workCode where workStreet, workCity, workState, and workCode are once again the variables you defined in Step 2. 7. Go to the input element with the id “homeoption”. Within the tag insert an onclick event handler that contains the following four JavaScript commands: (a) Set the value of the of the element with the id “street” to the value of the homeStreet variable; (b) Set the value of the element with the id “city” to the homeCity variable; (c) Set the value of the element with the id “state” to the homeState variable; (d) Set the value of the element with the id “code” to the value of the homeCode variable. 8. Go to the input element with the id “workoption”. Repeat the previous step except store the values of the workStreet, workCity, workState, and workCode variables. 9. Save your changes to the file and then load project01-04.html in your web browser. Verify that the contents of the page resemble that shown in Figure 1-26 and that you can switch the address information at the bottom of the page between home and work by clicking the corresponding option buttons.


Hands-On Project 1-4
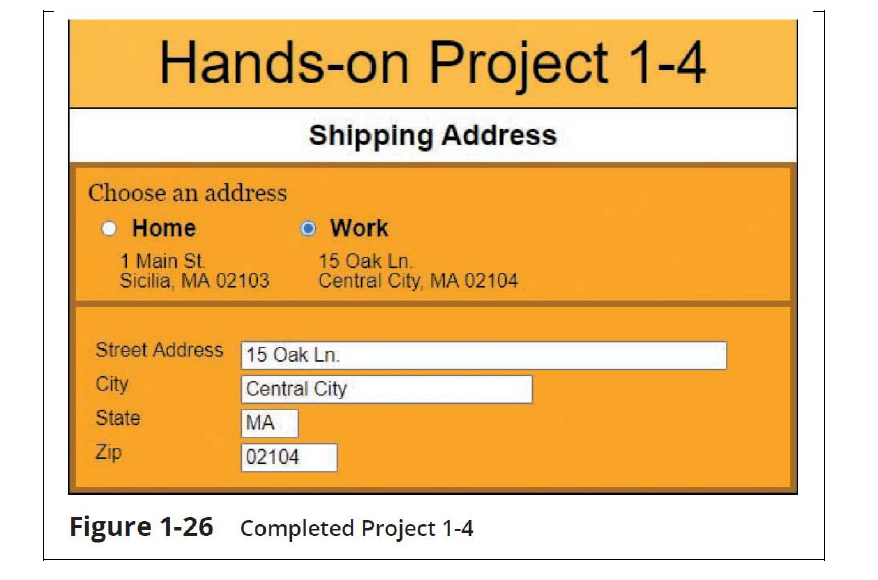
You learned how to dynamically change an image using the getElementById('id').src expression along with the onclick event handler. In this project you will use the onclick event handler to automatically fill delivery address input boxes with preassigned values using the expression:
document.getElementById('id').value = variable;
where id is the value of the id attribute of a web form element and variable is the variable value to write
into the element. A preview of the completed project is shown in Figure 1-26.
Do the following:
1. Use your code editor to open project01-04_txt.html and project01-04_txt.js from the HandsOnProject_01 folder. Enter your name and the date in the comment section of each document and save them as project01-04.html and project01-04.js, respectively.
2. Go to the project01-04.js file in your code editor. Below the comment section declare the following variables and initial values: homeStreet 5 “1 Main St.”, homeCity 5 “Sicilia”, homeState 5 “MA”, homeCode 5 “02103”, workStreet 5 “15 Oak Ln.”, workCity 5 “Central City”, workState 5 “MA”, workCode 5 “02104”.
3. Close the file, saving your changes.
4. Go to the project01-04.html file in your code editor. Directly below the closing </head> tag insert a script element accessing the project01-04.js file. Do not include the defer or async attributes so that the code in the external file loads as the HTML is loaded.
5. Directly below the closing </div> tag for the Home address, insert a script element. Within the script, insert commands to write the following two lines of HTML code:
homeStreet <br>
homeCity, homeState homeCode
where homeStreet, homeCity, homeState, and homeCode are the variables you defined in Step 2. (Hint: You will have to use the add operator ( 1 ) to combine the variables with the literal text strings in these two lines of code.)
6. Directly below the closing </div> tag for the Work address, insert another script element. Within the script, insert commands the write the following two lines:
workStreet <br>
workCity, workState workCode
where workStreet, workCity, workState, and workCode are once again the variables you defined in Step 2.
7. Go to the input element with the id “homeoption”. Within the <input> tag insert an onclick event handler that contains the following four JavaScript commands: (a) Set the value of the of the element with the id “street” to the value of the homeStreet variable; (b) Set the value of the element with the id “city” to the homeCity variable; (c) Set the value of the element with the id “state” to the homeState variable; (d) Set the value of the element with the id “code” to the value of the homeCode variable.
8. Go to the input element with the id “workoption”. Repeat the previous step except store the values of the workStreet, workCity, workState, and workCode variables.
9. Save your changes to the file and then load project01-04.html in your web browser. Verify that the contents of the page resemble that shown in Figure 1-26 and that you can switch the address information at the bottom of the page between home and work by clicking the corresponding option buttons.


Trending now
This is a popular solution!

Step by step
Solved in 3 steps


