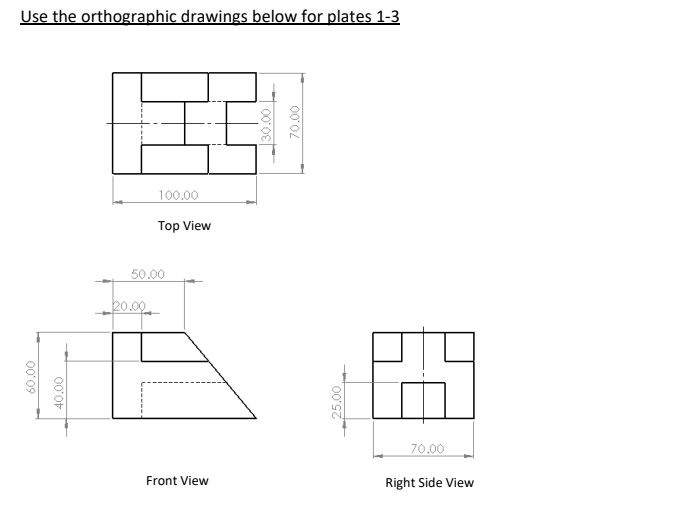
Draw the isometric projection of the object showing the top, front and right side.
Draw the isometric projection of the object showing the top, front and right side.
Precision Machining Technology (MindTap Course List)
2nd Edition
ISBN:9781285444543
Author:Peter J. Hoffman, Eric S. Hopewell, Brian Janes
Publisher:Peter J. Hoffman, Eric S. Hopewell, Brian Janes
Chapter3: Job Planning, Benchwork, And Layout
Section3.1: Understanding Drawings
Problem 4RQ: The line type used to show edges of an object that can be seen in a particular view is called...
Related questions
Question
Draw the isometric projection of the object showing the top, front and right side.

Transcribed Image Text:Use the orthographic drawings below for plates 1-3
100.00
Top View
50.00
70.00
Front View
Right Side View
70.00
00' 0E
25.00
00'0
00'09
Expert Solution
This question has been solved!
Explore an expertly crafted, step-by-step solution for a thorough understanding of key concepts.
Step by step
Solved in 2 steps with 2 images

Knowledge Booster
Learn more about
Need a deep-dive on the concept behind this application? Look no further. Learn more about this topic, mechanical-engineering and related others by exploring similar questions and additional content below.Recommended textbooks for you

Precision Machining Technology (MindTap Course Li…
Mechanical Engineering
ISBN:
9781285444543
Author:
Peter J. Hoffman, Eric S. Hopewell, Brian Janes
Publisher:
Cengage Learning

Precision Machining Technology (MindTap Course Li…
Mechanical Engineering
ISBN:
9781285444543
Author:
Peter J. Hoffman, Eric S. Hopewell, Brian Janes
Publisher:
Cengage Learning