A variety of procedural errors can impact the effectiveness of the copper reaction cycle. Comment on the following documented errors: When NaOH (aq) is added to the Cu (NO3)2 solution in Reaction B ( Cu(NO3)2(aq) + 2NaOH(aq) --> Cu(OH)2(s) + 2NaNO3(aq) ), the Cu(OH)2(s) occasionally does not precipitate immediately, and excess NaOH must be added. What other substance present in the reaction mixture might preferentially react with the NaOH and prevent precipitation of the Cu(OH)2? Explain. Students sometimes use HNO3 (aq) instead of H2SO4(aq) in Reaction E, Step 4, assuming that both strong acids will accomplish the same purpose. Briefly describe the consequences of this error.
A variety of procedural errors can impact the effectiveness of the copper reaction cycle. Comment on the following documented errors: When NaOH (aq) is added to the Cu (NO3)2 solution in Reaction B ( Cu(NO3)2(aq) + 2NaOH(aq) --> Cu(OH)2(s) + 2NaNO3(aq) ), the Cu(OH)2(s) occasionally does not precipitate immediately, and excess NaOH must be added. What other substance present in the reaction mixture might preferentially react with the NaOH and prevent precipitation of the Cu(OH)2? Explain. Students sometimes use HNO3 (aq) instead of H2SO4(aq) in Reaction E, Step 4, assuming that both strong acids will accomplish the same purpose. Briefly describe the consequences of this error.

Principles of Instrumental Analysis
7th Edition
ISBN:9781305577213
Author:Douglas A. Skoog, F. James Holler, Stanley R. Crouch
Publisher:Douglas A. Skoog, F. James Holler, Stanley R. Crouch
Chapter23: Potentiometry
Section: Chapter Questions
Problem 23.12QAP: What arc the advantages of microfabricated ISEs? Describe typical applications of this type of...

Related questions
Question
- A variety of procedural errors can impact the effectiveness of the copper reaction cycle. Comment on the following documented errors:
- When NaOH (aq) is added to the Cu (NO3)2 solution in Reaction B ( Cu(NO3)2(aq) + 2NaOH(aq) --> Cu(OH)2(s) + 2NaNO3(aq) ), the Cu(OH)2(s) occasionally does not precipitate immediately, and excess NaOH must be added. What other substance present in the reaction mixture might preferentially react with the NaOH and prevent precipitation of the Cu(OH)2? Explain.
- Students sometimes use HNO3 (aq) instead of H2SO4(aq) in Reaction E, Step 4, assuming that both strong acids will accomplish the same purpose. Briefly describe the consequences of this error. (Image of Experimental Procedure is attached)
- Students occasionally observe the formation of a solid white side product, sometimes appearing as a white residue on the walls of the test tube, in the recovery and isolation of the copper metal in Reaction E. Speculate on the identity of this white solid. (Use of online resources may be helpful.)
- Errors in experimental technique can result in the percent recovery of copper being too low or too high. Give at least one specific example of each type of error in technique and explain what could be done to ensure that those errors do not occur in the recovery. (Image of Experimental Procedure is attached)
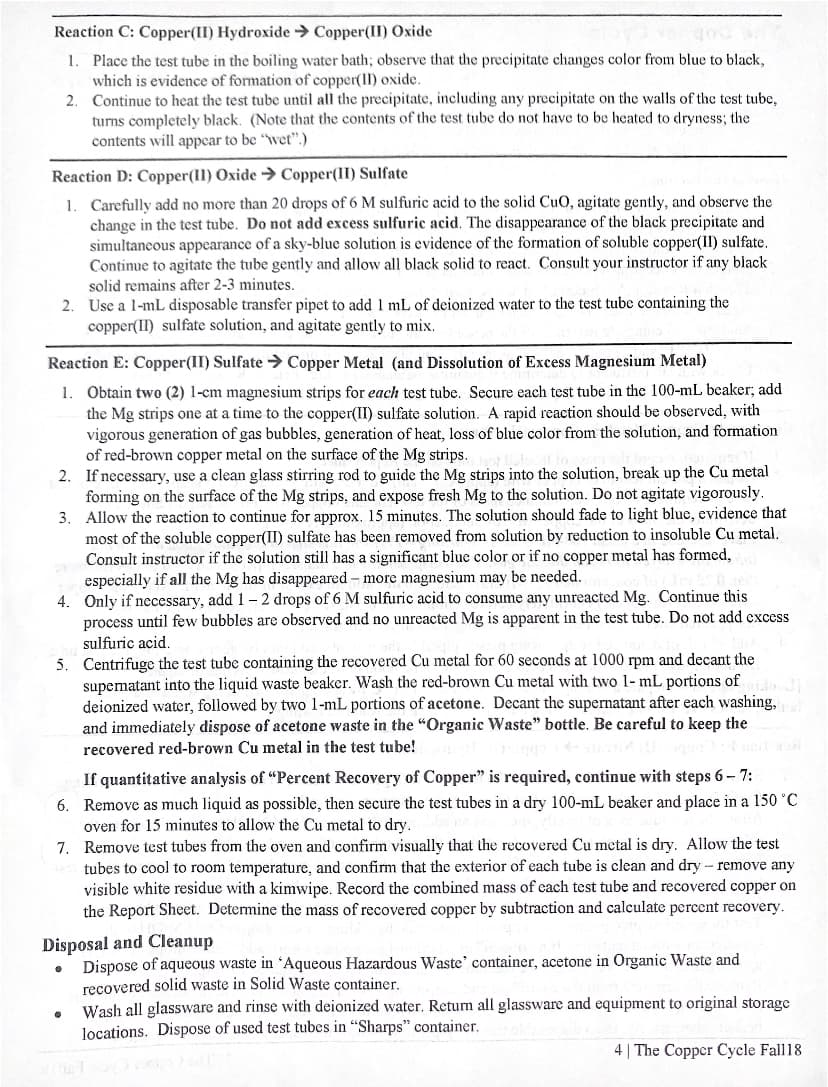
Transcribed Image Text:Reaction C: Copper(II) Hydroxide > Copper(II) Oxide
1. Place the test tube in the boiling water bath; observe that the precipitate changes color from blue to black,
which is evidence of formation of copper(II) oxide.
Continue to heat the test tube until all the precipitate, including any precipitate on the walls of the test tube,
turns completely black. (Note that the contents of the test tube do not have to be heated to dryness; the
contents will appear to be "wet".)
2.
Reaction D: Copper(II) Oxide → Copper(II) Sulfate
1. Carefully add no more than 20 drops of 6 M sulfuric acid to the solid CuO, agitate gently, and observe the
change in the test tube. Do not add excess sulfuric acid. The disappearance of the black precipitate and
simultaneous appearance of a sky-blue solution is evidence of the formation of soluble copper(II) sulfate.
Continue to agitate the tube gently and allow all black solid to react. Consult your instructor if any black
solid remains after 2-3 minutes.
2. Use a l-mL disposable transfer pipet to add 1 mL of deionized water to the test tube containing the
copper(II) sulfate solution, and agitate gently to mix.
Reaction E: Copper(II) Sulfate > Copper Metal (and Dissolution of Excess Magnesium Metal)
1. Obtain two (2) 1-cm magnesium strips for each test tube. Secure each test tube in the 100-mL beaker; add
the Mg strips one at a time to the copper(II) sulfate solution. A rapid reaction should be observed, with
vigorous generation of gas bubbles, generation of heat, loss of blue color from the solution, and formation
of red-brown copper metal on the surface of the Mg strips.
2. If necessary, use a clean glass stirring rod to guide the Mg strips into the solution, break up the Cu metal
forming on the surface of the Mg strips, and expose fresh Mg to the solution. Do not agitate vigorously.
3. Allow the reaction to continue for approx. 15 minutes. The solution should fade to light blue, evidence that
most of the soluble copper(II) sulfate has been removed from solution by reduction to insoluble Cu metal.
Consult instructor if the solution still has a significant blue color or if no copper metal has formed,
especially if all the Mg has disappeared - more magnesium may be needed.
4. Only if necessary, add 1-2 drops of 6 M sulfuric acid to consume any unreacted Mg. Continue this
process until few bubbles are observed and no unreacted Mg is apparent in the test tube. Do not add excess
sulfuric acid.
5. Centrifuge the test tube containing the recovered Cu metal for 60 seconds at 1000 rpm and decant the
supematant into the liquid waste beaker. Wash the red-brown Cu metal with two 1- mL portions of
deionized watcr, followed by two 1-mL portions of acetone. Decant the supernatant after each washing,
and immediately dispose of acetone waste in the "Organic Waste" bottle. Be careful to keep the
recovered red-brown Cu metal in the test tube!
If quantitative analysis of "Percent Recovery of Copper" is required, continue with steps 6- 7:
6. Remove as much liquid as possible, then secure the test tubes in a dry 100-mL beaker and place in a 150 °C
oven for 15 minutes to allow the Cu metal to dry.
7. Remove test tubes from the oven and confirm visually that the recovered Cu metal is dry. Allow the test
tubes to cool to room temperature, and confirm that the exterior of each tube is clean and dry - remove any
visible white residue with a kimwipe. Record the combined mass of each test tube and recovered copper on
the Report Sheet. Determine the mass of recovered copper by subtraction and calculate percent recovery.
Disposal and Cleanup
Dispose of aqueous waste in 'Aqueous Hazardous Waste' container, acetone in Organic Waste and
recovered solid waste in Solid Waste container.
Wash all glassware and rinse with deionized water. Return all glassware and equipment to original storage
locations. Dispose of used test tubes in "Sharps" container.
4 | The Copper Cycle Fall18
![The Copper Cycle
Experiment Procedure
Materials: Two (2) large disposable test tubes, l00-mL beaker, two pre-cut copper wire pieces, disposable
transfer pipets, deionized water, 15 M HNO3, 6 M NaOH, 6 M H2SO4, small waste beaker, 150-mL
beaker with boiling stones, hot plate, pre-cut Mg strips, acctone
General Instructions:
1. Students must wear laboratory goggles, lab aprons, and disposable gloves at all times.
2. The experiment requires use of concentrated acids and bases, a reactive metal (Mg), and acetone. Spills of
any type should be reported immediately to the instructor and cleaned up carefully.
3. Bottles of concentrated acids and bases must remain in the fume hoods at all times.
4. For each Reaction A - E described below, record detailed observations, as well as a balanced molecular
equation and a balanced net ionic equation, on the Report Sheet.
5. Students will complete two trials of the procedure concurrently. Using permanent marker, label test tubes
with "Trial I" and "Trial 2", as well as initials. Complete identical procedural steps with each test tube.
6. Check with lab instructor to determine if quantitative analysis of the "Percent Recovery of Copper" is
required for the lab report; if quantitative analysis is required, record all masses to the nearest 0,000lg.
Reaction A: Copper Metal → Copper(II) Nitrate
1. If required, record the mass of labeled test tube on the Report Sheet.
2. Obtain a pre-cut length of copper wire (approx. 1.5 cm); fold the wire into a circular shape, and place in test
tube. If required, record the combined mass of the test tube and copper wire on the Report Sheet and
determine the mass of the copper wire by subtraction (approximately 0.02 g).
3. Place test tube in a clean 100-mL beaker. Warning - Perform this step in the fume hood and do not
inhale the evolved nitrogen dioxide gas! Use a disposable 1-mL transfer pipet to add 5 - 6 drops (no more
than 0.25 mL) of concentrated (15 M) nitric acid. Do not add an excess of nitric acid. Allow the copper
wire to react (disappear) completely before continuing to the next step. If the copper wire has not
disappeared after 10 minutes of gentle mixing, consult your instructor.
4. Add -l mL of deionized water (using plastic pipet) to the test tube and mix by gently agitating the test tube.
Do not remove the test tube and beaker from the fume hood until the brown gas has dissipated.
[Looking ahead – Prepare a boiling water bath for use in Part C by adding 100 mL of tap water and a few
boiling stones to a 150-mL beaker, using a hot plate to heat the water to boiling.]
Reaction B: Copper(II) Nitrate > Copper(II) Hydroxide
1. Slowly add 10 drops of 6 M NAOH to the test tube with gentle agitation. Fomation of the blue precipitate
Cu(OH)2 should be observed; the test tube may feel warm to the touch.
2. Allow the test tube to cool briefly, then add an additional 10 drops of 6 M NAOH and gently agitate the
solution to assure complete mixing. Centrifuge the test tube for 60 seconds at 1000 rpm.
3. Remove the test tube from the centrifuge and observe; a blue precipitate should be at the bottom of the test
tube, and a colorless or very light blue liquid (the "supernatant") should be visible above the precipitate.
Consult your instructor if no precipitate is visible, or if the supernatant still has a significant blue tint.
4. Test for complete precipitation of copper(II) hydroxide by adding 3 more drops of 6 M NaOH to the
supernatant without agitation. If a “ribbon" of additional precipitate forms, add 5 more drops of NaOH,
agitate gently to mix. Centrifuge the test tube for an additional 60 seconds at 1000 rpm.
Remove the test tube from the centrifuge and confirm that the blue precipitate is at the bottom of the test
5.
tube. Carefully decant (pour off) the colorless supernatant from the test tube into a small liquid waste
beaker; alternatively, use a disposable transfer pipet to withdraw the supematant from the test tube.
3| The Copper Cycle Fall 18](/v2/_next/image?url=https%3A%2F%2Fcontent.bartleby.com%2Fqna-images%2Fquestion%2F1ea39568-56d5-4516-87e4-c65cf841eb0f%2F36045fba-1547-4ff5-a49c-e37353345103%2F8fcs2c_processed.jpeg&w=3840&q=75)
Transcribed Image Text:The Copper Cycle
Experiment Procedure
Materials: Two (2) large disposable test tubes, l00-mL beaker, two pre-cut copper wire pieces, disposable
transfer pipets, deionized water, 15 M HNO3, 6 M NaOH, 6 M H2SO4, small waste beaker, 150-mL
beaker with boiling stones, hot plate, pre-cut Mg strips, acctone
General Instructions:
1. Students must wear laboratory goggles, lab aprons, and disposable gloves at all times.
2. The experiment requires use of concentrated acids and bases, a reactive metal (Mg), and acetone. Spills of
any type should be reported immediately to the instructor and cleaned up carefully.
3. Bottles of concentrated acids and bases must remain in the fume hoods at all times.
4. For each Reaction A - E described below, record detailed observations, as well as a balanced molecular
equation and a balanced net ionic equation, on the Report Sheet.
5. Students will complete two trials of the procedure concurrently. Using permanent marker, label test tubes
with "Trial I" and "Trial 2", as well as initials. Complete identical procedural steps with each test tube.
6. Check with lab instructor to determine if quantitative analysis of the "Percent Recovery of Copper" is
required for the lab report; if quantitative analysis is required, record all masses to the nearest 0,000lg.
Reaction A: Copper Metal → Copper(II) Nitrate
1. If required, record the mass of labeled test tube on the Report Sheet.
2. Obtain a pre-cut length of copper wire (approx. 1.5 cm); fold the wire into a circular shape, and place in test
tube. If required, record the combined mass of the test tube and copper wire on the Report Sheet and
determine the mass of the copper wire by subtraction (approximately 0.02 g).
3. Place test tube in a clean 100-mL beaker. Warning - Perform this step in the fume hood and do not
inhale the evolved nitrogen dioxide gas! Use a disposable 1-mL transfer pipet to add 5 - 6 drops (no more
than 0.25 mL) of concentrated (15 M) nitric acid. Do not add an excess of nitric acid. Allow the copper
wire to react (disappear) completely before continuing to the next step. If the copper wire has not
disappeared after 10 minutes of gentle mixing, consult your instructor.
4. Add -l mL of deionized water (using plastic pipet) to the test tube and mix by gently agitating the test tube.
Do not remove the test tube and beaker from the fume hood until the brown gas has dissipated.
[Looking ahead – Prepare a boiling water bath for use in Part C by adding 100 mL of tap water and a few
boiling stones to a 150-mL beaker, using a hot plate to heat the water to boiling.]
Reaction B: Copper(II) Nitrate > Copper(II) Hydroxide
1. Slowly add 10 drops of 6 M NAOH to the test tube with gentle agitation. Fomation of the blue precipitate
Cu(OH)2 should be observed; the test tube may feel warm to the touch.
2. Allow the test tube to cool briefly, then add an additional 10 drops of 6 M NAOH and gently agitate the
solution to assure complete mixing. Centrifuge the test tube for 60 seconds at 1000 rpm.
3. Remove the test tube from the centrifuge and observe; a blue precipitate should be at the bottom of the test
tube, and a colorless or very light blue liquid (the "supernatant") should be visible above the precipitate.
Consult your instructor if no precipitate is visible, or if the supernatant still has a significant blue tint.
4. Test for complete precipitation of copper(II) hydroxide by adding 3 more drops of 6 M NaOH to the
supernatant without agitation. If a “ribbon" of additional precipitate forms, add 5 more drops of NaOH,
agitate gently to mix. Centrifuge the test tube for an additional 60 seconds at 1000 rpm.
Remove the test tube from the centrifuge and confirm that the blue precipitate is at the bottom of the test
5.
tube. Carefully decant (pour off) the colorless supernatant from the test tube into a small liquid waste
beaker; alternatively, use a disposable transfer pipet to withdraw the supematant from the test tube.
3| The Copper Cycle Fall 18
Expert Solution
This question has been solved!
Explore an expertly crafted, step-by-step solution for a thorough understanding of key concepts.

This is a popular solution!

Trending now
This is a popular solution!

Step by step
Solved in 2 steps with 1 images

Knowledge Booster


Learn more about
Need a deep-dive on the concept behind this application? Look no further. Learn more about this topic, chemistry and related others by exploring similar questions and additional content below.Recommended textbooks for you
Principles of Instrumental Analysis
Chemistry
ISBN:
9781305577213
Author:
Douglas A. Skoog, F. James Holler, Stanley R. Crouch
Publisher:
Cengage Learning
Principles of Instrumental Analysis
Chemistry
ISBN:
9781305577213
Author:
Douglas A. Skoog, F. James Holler, Stanley R. Crouch
Publisher:
Cengage Learning